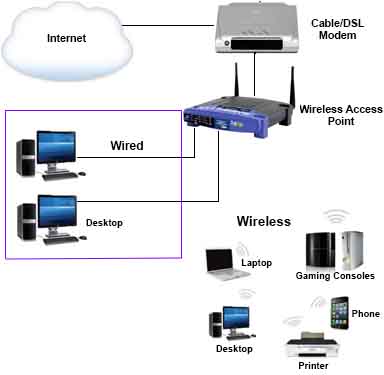
Configure Wireless Network Settings: A Comprehensive Guide
Setting up a wireless network is a crucial step in ensuring seamless connectivity for all your devices. Whether you're looking to create a home network or access the internet wirelessly, configuring your wireless network settings is essential. In this article, we'll walk you through the process of configuring wireless network settings, covering the basics of modem and internet connections, security, file and printer sharing, and setting up a wireless network in your home.
Why Configure Wireless Network Settings?
Configuring wireless network settings is crucial for several reasons:
- Securing your network from unauthorized access
- Optimizing network performance and security
- Enabling file and printer sharing across devices
- Setting up a wireless network in your home or office
Step 1: Access Your Router's Dashboard
To configure your wireless network settings, you'll need to access your router's dashboard. You can do this by:
- Logging in to your router using the default admin username and password
- Entering the IP address of your router in your web browser (usually 192.168.0.1 or 192.168.1.1)
- Navigating to the wireless settings page
Step 2: Change Your Network Name (SSID)
Change your network name (SSID) to something unique and easy to remember. This will help you identify your network and prevent unauthorized access.
Best Practices for Choosing a Network Name:
- Use a combination of letters and numbers
- Avoid using your name or personal information
- Make it easy to remember but difficult to guess
Step 3: Set Up Wireless Security
Configure your wireless security settings to prevent unauthorized access to your network. You can choose from WPA2 Personal, WPA3, or WPA2 Enterprise.
Best Practices for Wireless Security:
- Use a strong and unique password
- Enable WPA2 or WPA3 encryption
- Disable WPS (Wi-Fi Protected Setup) to prevent unauthorized access
Step 4: Configure Network Settings
Configure your network settings to optimize performance and security. You can adjust your:
- Channel settings to prevent interference
- SSID broadcast settings to prevent unauthorized access
- DHCP settings to enable IP address assignment
Step 5: Connect Devices to Your Network
Once you've configured your wireless network settings, connect your devices to your network using the new network name and password.
Common Issues and Solutions:
Some common issues you may encounter while configuring your wireless network settings include:
- Network connectivity issues
- Security breaches
- File and printer sharing issues
Troubleshooting Tips:
- Restart your router and modem
- Check your network cables
- Update your router's firmware
- Contact your Internet Service Provider (ISP)
Conclusion
Configuring wireless network settings may seem daunting, but with this comprehensive guide, you'll be able to create a secure and optimized network for all your devices. Remember to change your network name, set up wireless security, configure network settings, and connect devices to your network. By following these steps, you'll be able to enjoy seamless wireless connectivity and a robust network performance.
Additional Resources:
For more information on configuring wireless network settings, consult the following resources:
- Your router's user manual
- Your Internet Service Provider's documentation
- Online forums and communities

 Connection - wikiHow")


 - HP")
")
![[Wireless Router] How do I enter my ASUS router's setting page using ...](https://cdn.shopify.com/s/files/1/0474/7729/3217/files/4_3d2d25f8-0450-4f1e-8b79-4b47a66a85a1_500x.png?v=1713777162 "[Wireless Router] How do I enter my ASUS router's setting page using ...")