How to Configure G Router for Home Wi-Fi: A Step-by-Step Guide
Configuring your G router for home Wi-Fi is a crucial step in ensuring a seamless and secure internet connection. In this article, we will guide you through the process of configuring your G router for home Wi-Fi, providing you with the necessary information to set up a reliable and fast internet connection.
Step 1: Connect Your First Google Wifi Router
Start by turning on your first point, which is the primary Google Wifi router that sits between your modem and the rest of your devices. Make sure you have a stable power supply and a working internet connection.
Step 2: Set Up Your Google Wifi Mesh Wi-Fi System
Set up your Google Wifi mesh Wi-Fi system to expand Wi-Fi coverage throughout your home. To set up Google Nest Wi-Fi devices with an existing Google Wifi network, follow the instructions on how to use Google Wifi with Nest Wifi.
Step 3: Log In to Your Router
To log in to your router, you will need to open a web browser and type in the IP address of your router. The default IP address for most routers is 192.168.0.1 or 192.168.1.1. Enter your username and password to access the router's settings page.
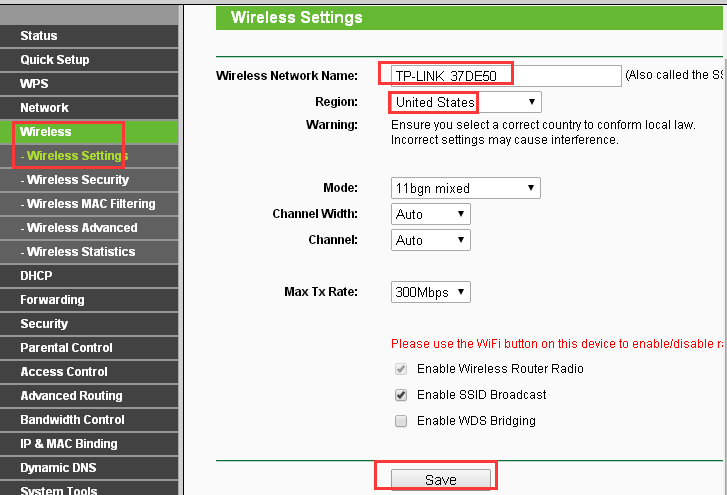
Step 4: Change Your Wi-Fi Network Name and Password
Change your Wi-Fi network name and password to secure your network and prevent unauthorized access. You can also change the Wi-Fi channel to reduce interference and improve signal strength.
Step 5: Configure Your Router's DHCP Options
Configure your router's DHCP options to force clients to use Pi-hole as their DNS server, or manually configure each device to use the Pi-hole as their DNS server.
Step 6: Optimize Your Wi-Fi Signal Strength
Optimize your Wi-Fi signal strength by adjusting the Wi-Fi channel, reducing interference, and using a Wi-Fi analyzer app to identify signal strength in different areas of your home or farm.
Step 7: Set Up Parental Controls
Set up parental controls on your home Wi-Fi router to block websites, limit screen time, and create a safer online environment for kids.
Step 8: Configure Your Router's Security Settings
Configure your router's security settings, such as enabling WPA2 encryption, setting up a guest network, and configuring firewall rules to prevent unauthorized access to your network.
Conclusion
Configuring your G router for home Wi-Fi is a straightforward process that requires attention to detail and a basic understanding of networking concepts. By following the steps outlined in this article, you can set up a reliable and fast internet connection and ensure a seamless Wi-Fi experience for all your devices.
Why is Configuring Your Router Important?
Configuring your router is essential for ensuring a secure and reliable internet connection. By setting up your router correctly, you can prevent unauthorized access to your network, reduce interference, and improve signal strength. Additionally, configuring your router's security settings can help protect your devices from malware and other online threats.
How to Choose the Best Router for Your Home
Choosing the best router for your home depends on several factors, including the size of your home, the number of devices you need to connect, and your budget. When selecting a router, look for one that supports the latest Wi-Fi standard, has a strong signal, and provides sufficient ports for connecting devices. Additionally, consider the router's security features, such as WPA2 encryption and a guest network.
Frequently Asked Questions
Here are some frequently asked questions related to configuring your G router for home Wi-Fi:
Q: What is the default IP address for my router?
- A: The default IP address for most routers is 192.168.0.1 or 192.168.1.1.
Q: How do I change my Wi-Fi network name and password?
- A: You can change your Wi-Fi network name and password by logging in to your router and accessing the settings page.
Q: How do I configure my router's DHCP options?
- A: You can configure your router's DHCP options by logging in to your router and accessing the settings page.


![[Wireless Router] How do I enter my ASUS router's setting page using ...](https://i.ytimg.com/vi/p8YkQyZGa8k/maxresdefault.jpg "[Wireless Router] How do I enter my ASUS router's setting page using ...")
